

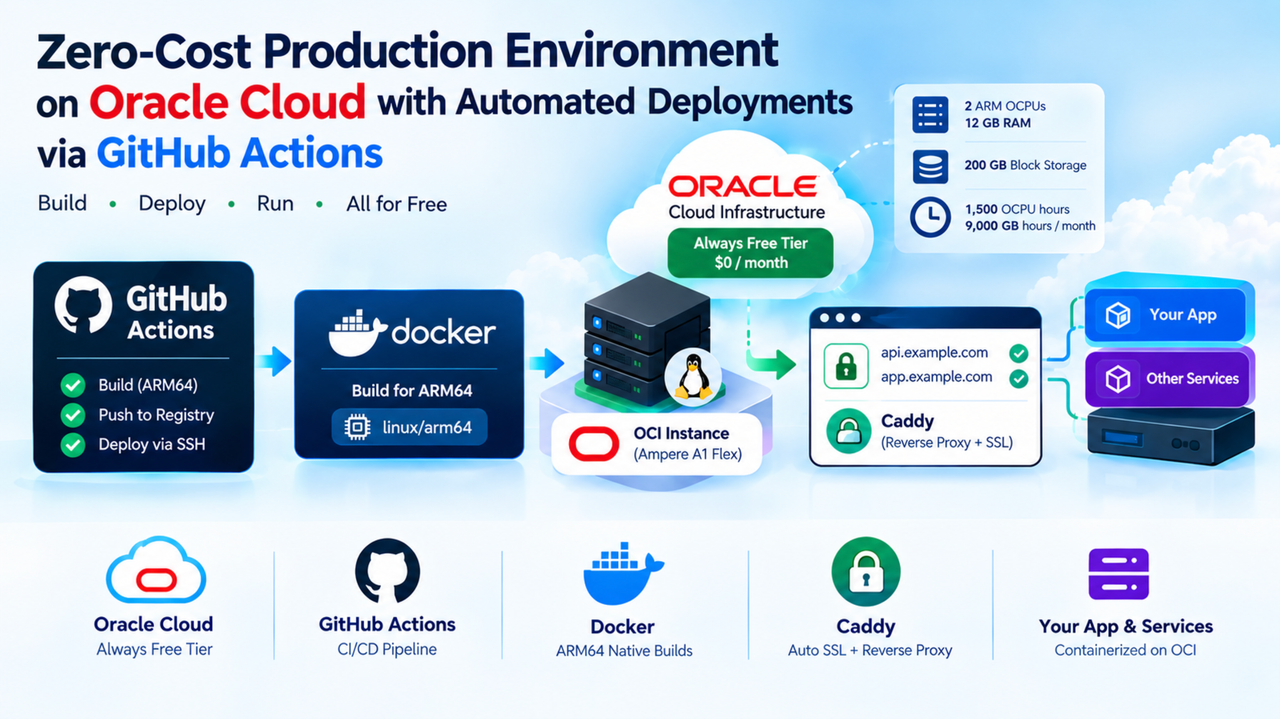
This guide walks through building a zero-cost production environment using Oracle Cloud’s Always Free tier, featuring automated deployments via GitHub Actions.
Cost & Value Advantage: Even if your workloads eventually scale beyond the free tier, OCI offers significantly lower pricing for compute, memory, and outbound data transfer compared to AWS, Google Cloud, or Microsoft Azure (including 10 TB of monthly outbound bandwidth free).
Oracle Cloud Infrastructure (OCI) offers one of the most generous free tiers in the cloud industry. Unlike other providers that give you tiny test servers that quickly run out of memory, Oracle's Always Free Arm Ampere A1 tier gives you powerful resources to host real projects for $0 per month.
Why Choose Oracle Cloud? (The Benefits)
- Generous Free Hardware: You get 2 OCPUs and 12 GB of RAM running on fast Arm64 hardware.
- 200 GB Total Storage: Plenty of space for your operating system, databases, and Docker container images.
- 20 GB Free Object Storage: S3-compatible cloud storage for secure off-site file and database backups.
- 5 Free Disk Backups: Automatic server-level snapshots directly inside the Oracle Cloud dashboard.
- 10 TB Outbound Data Transfer: Free monthly network bandwidth for live traffic.
Step 1: Choose Your Compute Architecture
CI/CD Architecture Note: If you are using external CI/CD platforms (like GitHub Actions, GitLab CI, Dokploy, or Coolify) to handle build steps and container management, you do not need a separate build VM. Skipping a self-hosted Jenkins server allows you to dedicate 100% of your free compute capacity and memory to a single production node.
Step 2: Provision Your Server on OCI
- Log into the Oracle Cloud Console and navigate to Compute > Instances > Create Instance.
- Image: Choose Canonical Ubuntu 24.04 or 22.04 LTS (aarch64).
- Shape: Select Ampere A1 Flex (ARM Processor).
- For Option B, set sliders to 2 OCPUs and 12 GB RAM (or 4 OCPUs / 24 GB RAM if eligible).
- Networking: Select Create new Virtual Cloud Network (VCN) and ensure Assign a public IPv4 address is checked.
- Boot Volume: Check Specify a custom boot volume size and set it to 200 GB to claim your full free storage quota.
- SSH Keys: Save your generated private key locally (
id_rsa).
Pro-Tip: Resolving "Out of Host Capacity" Errors
Due to high demand, creating Always Free Ampere ARM instances on a standard Free Tier account often results in an "Out of host capacity" error.
The Fix: Upgrade your tenancy to a Pay-As-You-Go (PAYG) account.
- Verification: Oracle performs a brief temporary authorization charge (~$1 USD, refunded almost immediately) to verify your identity.
- Free Quotas Retained: All Always Free tier quotas (2 ARM OCPUs, 12 GB RAM, 200 GB disk - 1,500 OCPU hours and 9,000 GB hours per month) remain 100% free forever.
- Priority Access: Upgrading moves your account to the higher-priority capacity pool, bypassing allocation limits and enabling instant instance creation without generating any charges as long as you remain within the free limits.
Step 3: Configure Network & OS Firewalls
Oracle Cloud enforces a dual-layer firewall: Network Ingress Rules (OCI Console) and Local OS Rules (iptables).
1. OCI Ingress Rules (Console)
- Go to Networking > Virtual Cloud Networks > your VCN > Security Lists > Default Security List.
- Click Add Ingress Rules and configure:
- Source CIDR:
0.0.0.0/0 - IP Protocol:
TCP - Destination Port Range:
80, 443, 22
- Source CIDR:
2. Local Firewall (Server SSH)
Connect via SSH and run the following commands to open web ports:
sudo iptables -I INPUT 6 -m state --state NEW -p tcp --dport 80 -j ACCEPT
sudo iptables -I INPUT 6 -m state --state NEW -p tcp --dport 443 -j ACCEPT
sudo netfilter-persistent save
Bash
Step 4: Install Docker & Server Dependencies
Run the standard setup script on your instance:
# Update OS packages
sudo apt update && sudo apt upgrade -y

# Install Docker & Compose plugin
curl -fsSL https://get.docker.com -o get-docker.sh
sudo sh get-docker.sh

# Allow standard user to run Docker without sudo
sudo usermod -aG docker $USER
newgrp docker
Bash
Step 5: Setup GitHub Actions CI/CD Pipeline
Because OCI Ampere instances run on ARM64 architecture, your GitHub Actions pipeline must explicitly compile Docker images for linux/arm64 (or linux/amd64,linux/arm64).
1. Set Up GitHub Repository Secrets
In your GitHub repository, go to Settings > Secrets and variables > Actions and add:
SERVER_HOST: Public IP address of your OCI instance.SERVER_USER:ubuntuSSH_PRIVATE_KEY: Content of your private SSH key (.keyor.pem).REGISTRY_USERNAME: Your Docker Hub or GHCR username.REGISTRY_TOKEN: Your Personal Access Token or password.
name: Build and Deploy to OCI Server

on:
  push:
    branches:
      - main

jobs:
  build-and-deploy:
    runs-on: ubuntu-latest
    steps:
      - name: Checkout Code
        uses: actions/checkout@v4

      - name: Set up QEMU (for ARM64 cross-compilation)
        uses: docker/setup-qemu-action@v3

      - name: Set up Docker Buildx
        uses: docker/setup-buildx-action@v3

      - name: Log in to Docker Registry
        uses: docker/login-action@v3
        with:
          username: ${{ secrets.REGISTRY_USERNAME }}
          password: ${{ secrets.REGISTRY_TOKEN }}

      - name: Build and Push Docker Image (ARM64 Native)
        uses: docker/build-push-action@v5
        with:
          context: .
          platforms: linux/arm64
          push: true
          tags: ${{ secrets.REGISTRY_USERNAME }}/my-app:latest

      - name: Deploy to OCI Instance over SSH
        uses: appleboy/ssh-action@v1.0.3
        with:
          host: ${{ secrets.SERVER_HOST }}
          username: ${{ secrets.SERVER_USER }}
          key: ${{ secrets.SSH_PRIVATE_KEY }}
          script: |
            docker pull ${{ secrets.REGISTRY_USERNAME }}/my-app:latest
            docker stop my-app || true
            docker rm my-app || true
            docker run -d \
              --name my-app \
              --restart always \
              -p 80:80 \
              ${{ secrets.REGISTRY_USERNAME }}/my-app:latest
YAML
Step 6: SSL Automation & Reverse Proxy
For running multiple containerized services on a single node, deploy Caddy as a lightweight reverse proxy with automatic Let's Encrypt SSL.
Create a docker-compose.yml on your server:
version: '3.8'

services:
  caddy:
    image: caddy:2-alpine
    restart: always
    ports:
      - "80:80"
      - "443:443"
    volumes:
      - ./Caddyfile:/etc/caddy/Caddyfile
      - caddy_data:/data
      - caddy_config:/config

volumes:
  caddy_data:
  caddy_config:
YAML
Create a Caddyfile in the same directory:
api.example.com {
    reverse_proxy localhost:8080
}

app.example.com {
    reverse_proxy localhost:3000
}
Start the proxy:
docker compose up -dBash
Critical Production Gotchas
- ARM Architecture Verification: Always ensure base images in your
Dockerfilesupport ARM64 (e.g.,node:20-alpine,python:3.11-slim,golang:alpine). - Idle Instance Reclaim Policy: Oracle reclaims Always Free instances if CPU utilization averages under 20% over 7 days. Add a light cron job or convert your account to Pay-As-You-Go (you remain charged $0 if within free usage limits) to eliminate reclaim risk.
- Static IP Reserved Address: In OCI Console, convert your ephemeral public IP address to a Reserved Public IP under Networking > Reserved IPs so it doesn't change on server reboots.